Tips
This is the last tips section that RBM will have, so
I've decided to go out with a bang. Here are an unbelieveable 6 tips!
Tip #1 - Morph BevelButtons
The bevel button control can obviously be used as a button. However,
if you set its bevel property to something higher than 2, you can turn it into any
type of appearance manager control! These include group boxes, Spin buttons, flippy
triangles, and a whole lot more. Only a few are very useful, but here are all the
possible values:
| 0-2 |
Small, Medium, and Large bevelbuttons |
| 16 |
A slider with a left facing thumb. |
| 20 |
A slider with a right facing thumb. |
| 24 |
A slider with a rectangular thumb. |
| 32 |
A right facing flippy triangle. |
| 33 |
A left facing flippy triangle. |
| 48 |
A progressbar |
| 64 |
A spin button |
| 80 |
Spinning arrows |
| 96 |
A placard |
| 112 |
A seperator bar |
| 128 |
A groupbox |
| 129 |
A groupbox with a checkbox. Use the value property to check/uncheck it. |
| 217-8 |
Time controls. |
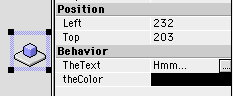
Tip #2 - Add Finder balloon help
 Nobody
has ever accused balloon help of being overused, but many programs (particularly
QuickTime) display some info when you move the mouse over their icon in the Finder.
Adding this type of your help isn't as simple as adding regular balloon help in RB,
but it's still not hard.
Nobody
has ever accused balloon help of being overused, but many programs (particularly
QuickTime) display some info when you move the mouse over their icon in the Finder.
Adding this type of your help isn't as simple as adding regular balloon help in RB,
but it's still not hard.
Just compile your program, and add an "hfdr" resource with an
ID of 18. Using a template such as Resorcerer's, you can make this resource contain
a string, point to a string elsewhere in the file, use styled text, or even contain
a picture!
Tip #3 - Put non-controls in a window
 In
2.x, you can put just about anything in a windoweven a class that has nothing to
do with a control. Doing this makes it much easier for you to access the class's
properties and methods. And, as an added bonus, if you click the "Visible"
checkbox in the properties dialog, you can make the class's properties appear in
the properties window! Now if only that worked for control subclasses
In
2.x, you can put just about anything in a windoweven a class that has nothing to
do with a control. Doing this makes it much easier for you to access the class's
properties and methods. And, as an added bonus, if you click the "Visible"
checkbox in the properties dialog, you can make the class's properties appear in
the properties window! Now if only that worked for control subclasses
Tip #4 - Draw a window
In 2.x, every window sports a new method: DrawInto. This method
takes three parameters: a graphics object, and an x and y coordinate. Using it, you
can draw the content of the window into a graphics object.
Tip #5 - Use Graphics Exporting
A new feature in 2.1 is the QTGraphicsExporter class. Using this,
you can easily save a picture object into a file using a variety of formats. And
unlike the ExportPicture function, they don't require you to show a save dialog (though
you can). To create a graphics exporter, use the GetQTGraphicsExporter function.
It takes a four letter string which corresponds to the type code of the file that
you want to save. For example, PICT is for PICT, JPEG is for JPEG, and so on. After
this, you can use the rest of the class's methods to manipulate the image, and eventually
save it:
- HasSettingsDialog As Boolean - True if a settings dialog exists for
the file format.
- RequestSettings As Boolean - When this method is called, the settings
dialog for the image type is shown. Returns true if the user clicks OK, false if
they click Cancel.
- DefaultExtension As String - The default extension for the file format
(ie, ".jpg")
- DesiredTargetDataSize As Integer - The size of the file when it's saved.
- CompressionQuality As Integer - How much to compress the image.
- OutputFileType As String - Four letter type code of the file.
- OutputFileCreator As String - Four letter creator code of the file.
- SavePicture(location As Folder, image As Picture) As Boolean - Saves
the picture to location. Returns true if it works.
Tip #6 - Put a placard behind a window
 Plain
document windows don't really look that great in OS 8. To spruce them up, many programs
put a placard at the back of the window to give it a beveled look. This is easy enough
to do in RB (see the screenshot), and it'll really improve the look of the window.
Plain
document windows don't really look that great in OS 8. To spruce them up, many programs
put a placard at the back of the window to give it a beveled look. This is easy enough
to do in RB (see the screenshot), and it'll really improve the look of the window.
There is one problem though: it may not seem possible to select the
window itself (after all, there isn't any space that doesn't have a control). Fear
not though, simply click on a control, and then shift-click to deselect it. The window
is now editable from the properties window.
Tip #7 - Use LockLeft, LockRight, etc.
Making a window resize correctly is a pain.You have to manually write
code in the resize event to move and change the size of each control. Right? Nope!
All controls have four properties that will help you: LockLeft, LockRight, LockTop,
and LockBottom. How do they work? Pretty simple. This diagram should help. Left is
LockLeft, Right is LockRight, and so on. Bot stands for Bottom and Rgt stands for
right.
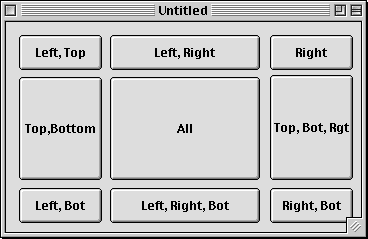
If we set the Lock properties as this window instructs us, all the
buttons will resize on their own.
What do the values stand for? They LOCK the distance from the edge
that you specify. For example, the bottom right button will always be the exact same
distance from the bottom edge and the right edge if its LockRight and LockBottom
properties are checked. What if LockTop and LockBottom are both checked? The control
will resize, just like the controls that aren't on corners do in this window. This
should save you a LOT of code, but if you stlill need to use the Resize event, remember
that controls with Lock properties checked are resized before Resized is fired.