Sockets
Cover Story
For most people, nothing can
be more confusing than the TCP/IP socket control (making it great for a cover story!).
However, this control is something that makes RB almost as good
as any other programming language for internet apps.
 Before
the Internet, the only way to connect to the outside world using a modem was to talk
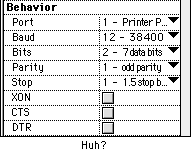
directly to the modem. This was a confusing and complex mess. For an idea of all
the settings you had to have, just look at a serial control. I doubt you ever wanted
to know what XON, CTS and DTR were, not to mention Stop bits and Parity. Though there
was a lot you could do with a modem, there were still a few things that were impossible,
like being connected to two places at once.
The internet changed all that. Now, you could have multiple
connections open at the same time. And as an extra bonus, you didn't have to fiddle
with all those cryptic settings!
Simply transmitting data is pointless though. You have to send
it in some type of format. A system for sending requests, and getting files from
a server is called a protocol. There are doezens of protocols, and you can make one
of your own if you want. All you'll need to do is create a server application, and
a client application.
But enough of making your own protocol. Here's a list of all
the major protocols, and what subclass you can use to access them:
| Protocal |
Class |
Price |
Author |
|
| HTTP-Hypertext Transfer protocol |
httpSocket 1.3 |
free |
Dan Vanderkam |
| FTP-File Transfer protocol |
RB FTP |
free |
Brian F. Jones |
| Hotline-Hotline Protocol |
HotlineSocketLite
HotShell*
HotSocket * |
free
free
$30 |
Jason Toffaletti & Spht
Kevin Pfohr & Nick
James Milne |
| POP3-Post Office Protocol |
POP3 Class |
free |
Bjorn Einhugur |
| SMTP-I have no idea. |
xSMTP |
free |
Brian F. Jones |
| Finger-Finger protocol |
CrossFinger |
free |
Brian F. Jones*** |
| Telnet |
<none> |
-- |
-- |
| AOL-America Off (oops!) Online** |
<none> |
-- |
-- |
*-These haven't been released yet
**-Yes, AOL is a protocol.
***-Yes, Brian Jones is the god of RB Sockets.
Making your own protocol
The first step in making your own protocol is laying it out, deciding
what it will do, and how it will do it. Let's make our protocol a simple chat protocol.
Here's how it will work:
• Everything that is sent is sent in the following format:
| NORM |
Hello Everyone! |
}~\ |
A four letter code that tells
the server what type of info
is contained in the next field. |
The actual content. This
would appear in the chat
window. |
A terminator that tells
the server that the info
is done. |
• There are three codes:
NORM - A normal chat item
OPTN - A special chat item (like an opt-chat in Hotline)
• There can only be two people on the server (this is for simplicity).
Confused? It's not that bad. Here are some examples of what is sent
and what happens:
| What is sent |
What happens |
| NORMHello everyone}~\ |
Someone: Hello Everyone appears in everyone's chat window. |
| OPTNis insane}~\ |
*** Someone is insane appears in everyone's chat window. |
Hopefully that made it a tad more clear. All that the client
applications will ever recieve is text that ends with }~\. They simply put
that in the chat window.
Making the server
The server application is the most important part of a protocol. It
will do most of the work, and has to be in near-constant communication with multiple
people.
Sockets can either listen or connect. If a socket is listening, then
it waits for other sockets to connect to it (using their cleverly named Connect
method). If they're not listening, then they can connect to any other server that
IS listening.
For a server naturally, all the sockets should be listening. That
way, when a client connects, they can respond correctly.
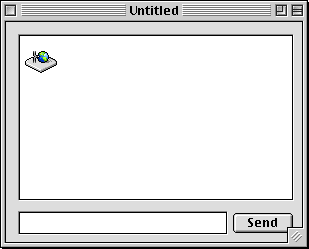
So, in the server project, create a socket (make sure its port property
is set to 4222) and and two editfields. Then create a pushbutton next to the second
editfield. In the window's open event, put this code: Socket1.Listen. This
forces the socket to wait until a user connects to it. Also, create a property in
the window called "p as string" The window should look something
like this:
Now open the code editor for the socket. In the DataAvailable event,
put in the code you see below:
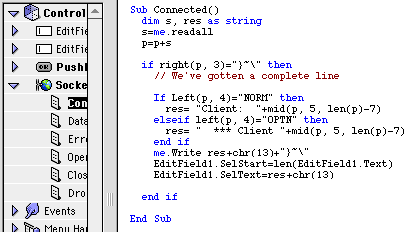
This code runs whenever the client has sent data. For example, when
they type a line of chat, this routine handles it. It takes whatever they sent, and
sends it back in the correct format. Then, it adds it to the server's chat window.
Now we want the server to be able to send some chat text of their
own! So, in the pushbutton's action event, put this:
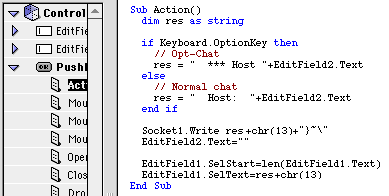
This allows the person running the server to participate in the chat
as well. The last two lines of each of these pieces of code add the text to the edit
field. Why didn't I just use "EditField1.Text=EditField1.Text+res"?
Because that makes the field flicker like crazy (see last
month's tips).
Believe it or not, that's all there is to the server! That wasn't
hard at all! Now for the client, which isn't even that complicated...
The Client
The client is the part of the program that does
the connecting. So, for a start, make a window that looks like this:
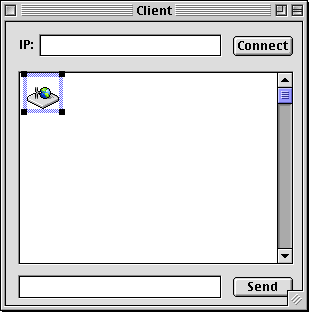
The client program is fairly simple. Also make a "p as string"
property in it, just like you did in the server project.
In the Connect button's action event...

This tells the socket what server to connect to, what port to use,
and then connects.
In the DataAvailable event of the socket...
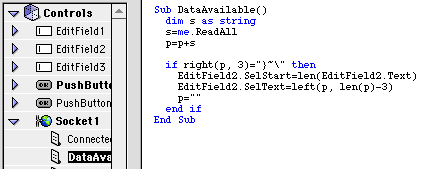
This routine is similiar to the server's, but it doesn't send back
any text. It just takes whatever it gets, checks to see if that's all there is, and
then adds it to the chat field.
In the Send button's action event...
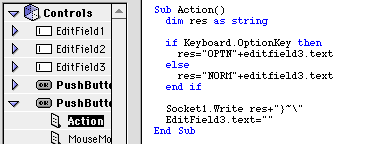
This routine is simple enough. It checks whether they held down option
as they sent the chat. It then sends the chat text and info to the server in the
correct format.
And you're done!
Compile both projects, and run the server. Then open up the client,
and type in "127.0.0.1" in the IP field. 127.0.0.1 is a shortcut that basically
means "my IP address". Then click connect, and chat away!
If you want to connect to another person, then type their IP instead
of 127.0.0.1. You can find your own IP in the Info box of your PPP program (i.e.
OT/PPP, FreePPP, MacPPP, etc.)
More Stuff
As you probably realize, this client/server demonstration is hardly
very powerful, but it could easily be improved. Here are some tips that you might
want to try yourself:
- Support for multiple users on at once. Just use a different socket & port
for each.
- Support for user lists
- Names
- Messages
- Administrative messages
- Disconnecting
- Anything else you might want to do.
This tutorial should give you the groundwork for making your own protocols,
and client & server apps. Who knows, you might just make the next Hotline...
 Before
the Internet, the only way to connect to the outside world using a modem was to talk
directly to the modem. This was a confusing and complex mess. For an idea of all
the settings you had to have, just look at a serial control. I doubt you ever wanted
to know what XON, CTS and DTR were, not to mention Stop bits and Parity. Though there
was a lot you could do with a modem, there were still a few things that were impossible,
like being connected to two places at once.


